Thursday, December 18, 2008

making a list and checking it twice...

A big warm hello to all of you go-go girls and Merry Christmas to you! With a big red bow on top.

We have a new lovely vintage Christmas challenge for this week. What are a few of your favorite things? What do you want for Christmas? What memories are triggered by the season, and what is it about the holidays that makes us all warm and nostalgic?

Maybe it's all the nice things you can't buy... like hugs, and fires in a fireplace and black and white photographs.

Christmas trees, old fashioned lights and ornaments, red flannel, chopping wood, baking pies, big family dinners, fireplaces, hot drinks in old mugs, quilts and aprons. Brown paper packages, string ribbons, old movies. Making footprints in the snow, singing carols, little girls in frilly dresses, black patent leather shoes and tights, stringing popcorn, faces of loved ones glowing in the lights from the tree.

If you want to play along, we're asking you to make a list or write down your thoughts on all the things that you love about the holiday season. Whether it's the presents or the sweets or the excitement of children and Santa or just winter in general – just pick up a pen or start typing, and don't think.

We'll start with Kim's amazingly inspiring project!


I call this 'automatic writing' (and there was a little art movement around this concept which I find quite inspiring) and it's a great way to pass on your thoughts as-they-come to someone else. Take maybe 10 minutes, give yourself a time limit and see how much paper you can fill up. Or see how long it takes you to fill the back of a 4X6 picture. Sometimes it helps to give yourself a ‘starting point’.

(This is a page from my art journal, prompted by something my boyfriend said.)

but it can just be a chunk of text;

and i took these words and typed them into flickr and made a little collage of inspirational images;

(1. Tea and cake, 2. Monty's Korner, 3. Well, what do you keep in your sock drawer?, 4. Untitled, 5. I♥, 6. Shhhhhhhhhhhhh…!, 7. Tea Corner..., 8. Untitled, 9. Untitled, 10. Christmas ahead, 11. ., 12. .those who feel the breath of sadness, 13. .so wait for the stone on your window, 14. ., 15. thermos, 16. day 115 - thermos, 17. Brown Paper Package ..., 18. KEPT US GOING, 19. ___________________, 20. lights101, 21. golden, 22. Untitled, 23. Untitled, 24. wood 2, 25. Second Snow, 26. Untitled, 27. just tired., 28. lunch time., 29. my mum, 30. happy., 31. lucy, 32. wedding dinner - a composition in sepia, 33. christmas sweater party polaroid, 34. campfire, 35. once upon a time..., 36. A quest for the most perfect yellow yarn...)
(Swooning over that gorgeous art journal page ...)

And now for our stellar special guest... the lovely, the merry and bright Sandy Pool! (You may also know her as PaperPoppies.) Sandy can be spotted over at Say It in Scrap and The Creative Type. We love this girl, because not only is she incredibly talented, but she's real and sincere and kind to everyone she meets. (And not just at Christmastime.)

Hey there!!! Well, I am beyond honored, and totally humbled to be here! I have so much love for Jen, and Kim and to get to hang with them for this challenge is a dream. What can I tell you? I'm a very shy girl, a Canadian girl, and I LOVE everything and anything to do with makin' stuff. I started scrapbooking in grade 7! Yeah, that would be oh....23 (holy crap) years ago. But now those pages, and my old love letters have mostly disintegrated. These days I'm a little more careful about things like scotch tape, and construction paper (well usually). This 'awareness' happened almost 4 years ago. (-; That's when I got married to my wonderfully nerdy husband Joe (yay nerds!), who has barely made an appearance on a scrapbook page since our little Ella was born almost 3 years ago. I thought it was time to pay homage to him.

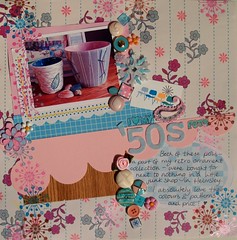
I love Christmas, so getting an assignment like this was so much fun! To some people vintage means distressing, and lace, and classic design, but to me vintage means doing things up retro, and old-school. I had so much fun pulling out these old pictures, and looking back on my 'vintage' memories.


Have a wonderful season everyone!!!!!! xoxo


(Awesome, yes?! Chevy Chase lights ... haa!!)

And Jen!

This page is home to all of my very favorite black and white photos of my mom and her sister at Christmastime in their farm house in rural Iowa. I'm so lucky that my grandma was a picture-taker!

I adore the picture of my grandpa driving in the snow, the old tree covered in tinsel and garlands, and my mom as Mary in the church's Christmas nativity. The buttons I used were all my grandma's.

And this is a list of Christmas traditions that we have started with my little girl. Both of these pages are going into my Journal Your Christmas book (a December daily project with the lovely Shimelle Laine.)

And the winner from our last photo transfer challenge?

Ms. Glenda T! We absolutely adored your art journal ode to John Rzeznik (and what a perfect technique for a rocker page.) Email Jen at jgeigley [at!] gmail.com for your sweet prize!

Now go on and make your Christmas list. Document what you love about the holidays. (As Kim calls it, 'automatic writing.') Because we like to keep things simple during the holidays! And check back with us in two weeks for another chance to work your soul. Wanna know what you're playing for? Trust me, it's good.

You could win the Dorothea December kit from Kenner Road! Check out all the gorgeous details in this baby - it could be yours! (Thanks so much to Kerry Lynn for this loveliness!)

xoxo and Happy Holidays to you!!!
Friday, December 5, 2008

kim's clever transfers title goes here!


For this weeks challenge, I’m going to shake it up a bit! This isn’t going to be so much a photo tutorial, but a way that you can play with your photos after you’ve taken them. I want you all to get a bit funky and messy with it this week!

So- the inspiration is torn and weathered posters or billboards. Are you familiar with an artist called Mimmo Rotella? His work was celebrated throughout the 60’s until today, for his fresh approach to street-art and his simple- but effective collages.


I love the rips and tears that are created, having another layer peeking in from behind it- so I did a little searching and asking around, and I found this really easy way to Transfer your photos onto a different background- that gets some really cool effects!

Do you remember this journal page I did over the summer?


This is transfermagiclove. Want some of that magic? Get your stuff together and we’ll start groovin’!

What you’ll need;

-Liquid glue of some kind- I use PVA, but anything that you can mix with water and that is sticky. (this should also work with solvents)
-A big paintbrush (the thicker and stronger the bristles are- the better).
-A workspace covered with newspaper.
-A cup of Water, and a mixing surface (like, greaseproof paper or a plastic plate or palette).
-A ‘rubbing’ tool (a bone folder, popsicle stick, back of spoon…).
-An Ink-Jet printed picture. (one from a home printer- you need to make sure the ink can come off. A quick test to make sure is, put a drop of water on it, if it bleeds and smudges you’ve got the right kind!)
- Some coloured papers.

For the Picture- you really want something in Black And White to start off with- something with high contrast too, remember, the WHITE areas will probably end up being the colour of your background paper. I like to print off several small images of the same picture- to play with, smaller is good, like 4-6 inches on either side. Because you are going to be placing the image face down, flipping (reversing) the photo in Photoshop will give you the right on the right side at the end. Image> Rotate Canvas> Flip Canvas Horizontal

An important thing to remember is that this is going to be MESSY! And I seriously mean this- you will probably end up with glue and bit of paper in your hair! So roll those sleeves up! And it takes a few practices so don’t do it straight on your page which you’ve spent hours making (trust me!).

1. Cut out your picture- separate it from any other printed image, I like to leave a little white boarder.
2. Pick your paper- brown, yellow, and lined are my favourites, but most colours work well. Start with something light. Cut it to the size you want- so your picture will fit on it.
3. Pour some glue onto your mixing surface and get a paintbrush full of it!
4. Apply the glue to the area where your transfer will be. Put a little bit of water on your brush and rub the heck out of that area on your coloured paper. The more you rub, the more the fibres of the paper can relax.
5. Rub that glue in a little bit more.
6. Put your picture FACE DOWN onto that gluey mess that is your coloured paper.
7. Get your brush wet with water and paint the back of the picture with this. Some of the ink should be seeping into the white of the paper you printed it on.
8. Rub the back of the picture with your paintbrush. Add a bit of glue if it gets too wet- but don’t go overboard!
9. Put your brush down and assess the situation.

Is your paper really soggy? If yes- let it sit for a while and try another one, this time with less water. If no- keep reading.

Is your paper sticky and kind of dry? If Yes- you are on the right track! Add a bit more water and try rubbing the back with your rubbing tool- be careful not to rip the picture in awkward places! If No- keep reading.

Is your paper slightly wet but kind of sticky? If Yes- yay! See step 10. If No- keep reading.

Has all the rubbing that you’ve just done created little rolled up bits of paper or clumps of paper coming off of your picture? If Yes- don’t panic! This is fine. See Step 10.

Does your paper look like you’ve put it through the dishwasher? If Yes- try again!

10. Try peeling back the corner of your picture away from the paper and see what’s happened.

All the colour has leaked and it’s a purple/black blob of watery messy-ness! Oh dear- don’t fret. Check another corner, if the same this occurs, set aside and let to dry a little bit more.

The picture ripped! That’s cool- does it look neat? You may have actually adhered some of your picture to the paper. Try ripping it more, from another corner- is there anything left behind on the coloured paper? If you aren’t happy try rubbing the back more, getting it wetter and seeing if it will pull off easier.

The picture lifts off easily and there isn’t anything on the paper! Ut-oh! Did you do Step 4 and 5? Is your image the right kind of printed photograph?

The picture lifts off easily and there is ink on the paper! WOO! Be careful that the ink isn’t really watery and will run everywhere. If you don’t like it- try repeating steps 4-9.

11. You should now try and pull back the picture. Try ripping it- leaving parts of the picture on the paper.
12. Take a look- does it look nice? Try another one, try something a bit different. Sometimes the picture looks nicer than the transfer.
13. Let it dry.

I find that this is best done with friends. Invite someone over and tell them you’re going to play glue and paper and getting messy. It’s really fun to teach someone too because every transfer is different and the more you do it- the more you’ll find out what works best for you. So PLAY! I will be replying to any questions you have via the comments in this post- don’t hesitate to ask!

Here are some examples of successes and little mess-ups that I’ve grown to love.


Try and incorporate it into a scrappage or a journal entry. I’ve often found this very difficult because you’ve just ‘ruined’ your picture, but it can have really nice effects! Try sticking one through your friend’s door with a little note on the back, ring the doorbell and run! Mail one to your husband’s work for something to put up in the office. Try using one as a postcard (after all, it’s already ripped).

For this challenge I wanted to use one in a scrappage so I transfered straight onto a 12x12 piece of cardstock and added stuff around it. I wanted to keep it simple too.


We also have an AWESOME girl as guest designer this week! She rocks out the messy-gorgeousness and we are so happy to have her play along, If you don’t know her- wave a happy hand at Christina!

"Well hello there. My name is Christina, though some people know me as the girl who likes coffee way too much. :D
Besides scrapping and playing with mixed media projects, I love photography and have recently become an avid camera collector, particularly of vintage polaroid cameras and TLRs whch are used for TTV (or through the viewfinder) style photography. I live in Seattle (land of coffee) and work for Starbucks (are you seeing a trend here?). I also have a cute boyfriend who has been with me for almost ten years.

I am so delighted to be playing along with this Work Your Soul challenge.

As I write this, my hands are covered in glue and paper bits, This was a very fun technique to try, but it took me a few times to get the hang of it. And along the way I learned some very valuable lessons.

One. This site is awesome inspiration/eye candy and Kim and Jen are super nice chicas.

Two. If you use PVA, wait for it to dry. No really. Working with glue and water as adhesives when doing collage is tricky and if you do it wrong, you could end up with your photo transfer stuck to your hair, and then possibly your face. (True Story)

Three Be prepared for your printout to do weird things. You might see black, but it could give you pink, or purple when it gets wet. It's an adventure, like all good projects. Have fun."


ohhhh. How nice is that! Yumyum!

(OH MY GOSH THIS IS AMAZING:)
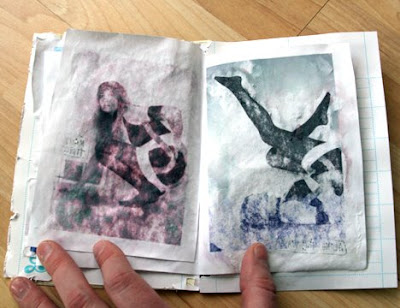
Jen's photo transfer mini book...


I used a paper shopping bag + other found papers and Modge Podge as my glue, just because that's what I happened to find around the house! I used both black and white and color photos and got some really interesting effects. I love how the photos look after they've ripped and gotten stuck in places. I could happily play with this technique for hours. :)

This is my expression everytime one of you guys share with us what you’ve made;

so- thank you for putting a smile on my face!

All right, Soulies, you know what to do! Post links to your take on this challenge here or in our Flickr group by December 18th.

The winner will receive an awesome vintage holiday mini book (made from an old cover of a book, vintage lace, trims, sheet music, and all sorts of cool papers) from The Artsy Cottage on Etsy! Very cool.

And our winner from our last fun challenge is.....
Julie- you took the design from your finds and put it on your page really well!

congrats!
Email your name and mailing address to jgeigley [at!] gmail.com for your prize pack.